
Available Tutorials
Creating a Primary Sync Account
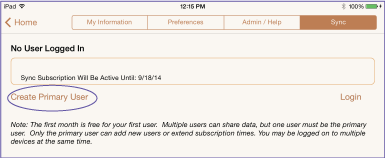 The first month of the sync subscription is free for the first user so that you can have an opportunity to test drive it. You just need to create an account to start. To do that:
1- Go to Settings and select the Sync tab
2- Select the create primary user and create your account.
3- On Shelf will check with the server to make sure that the selected user name is not already in use
4- On Shelf will verify that all of the required information has been entered and then will ask the server to create your account
5- Once your account has been created, the sync should start immediately
Warning: Never create a second primary user account. If you do then your data will not be successfully synced because your data will be "owned" by two different users and there is no way to merge the data.
Note: The same user can be logged onto multiple devices at the same time. Expired sync accounts are deleted from the server if they have been inactive for at least 6 months.
Adding Multiple Users
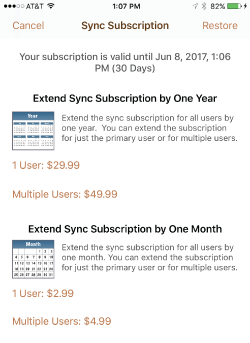
After you have created the primary user account you have the option to purchase the ability to have multiple user accounts. To do that:
1- Go to Settings and select the Sync tab and verify that you are logged into the primary user account.
2- Select the option to "Extend Subscription/Add Users"
3- Pick one of the multiple user options. If you select one month then one month will be added to the subscription. Similarly, the selecting one year will add one year to the subsrirption.
4- When the subscription has been successfully process, you will be returned to the sync user screen. There should be a new table at the bottom of the screen.
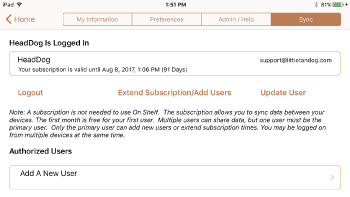
5- Click on "Add ANew User" to create a new user.
Login To Your Sync Account
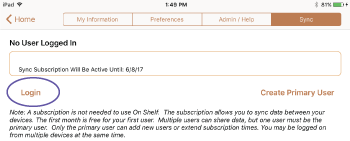
After the primary user has created your account:
1- Go to Settings and select the Sync tab.
2- Press the Login button
3- On the next screen, enter your username (not your email) and password
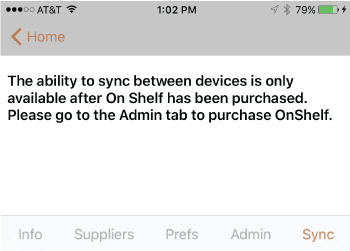
Note: If you are using an iPhone and see the message in the second image when trying to login, then the app needs to be unlocked. The instructions for unlocking the app can be found below.
Sync Information/Troubleshooting
Setting up on Multiple Devices:
- If you have information on mulitple devices, you will need to designate one as the master device for the first sync. You should then backup your other devices and then delete OnShelf.
- After the master device has completed syncing to the server, then back up your secondary devices and delete OnShelf from the secondary devices. Then reinstall a fresh version and login to the sync account.
- The procedure is necessary to prevent duplicating information that is on both devices. (Each entry is given a unique identifier when it is created. Items created on different devices will be assigned a different identifier and are treated as separate entities even if they have the same name.)
Note: If you are using an iPhone and see this screen when trying to login, then the app needs to be unlocked. The instructions for unlocking the app can be found below.
The Sync Process:
 - If you’ve been using the app for a while, then the first sync may take some time. My sample file takes about 5 minutes, yours may take longer.
- Try to do the first sync when you have a strong WiFi signal
- For best performance, wait until the sync has finished on your main device before trying to sync the second device. The reason for this is that it will ensure that all of the data reaches the second device with the first sync. If you do not wait, then it may take multiple syncs for all of the data to arrive.
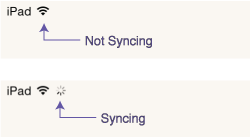
- You can tell if a sync progress if the little wheel is spinning next to the wifi signal indicator in the upper left hand corner.
- You do not need to be online to use the app - it will sync when it can
- The sales summary numbers are calculated on your device - so the numbers will only match if both devices are fully synced
- You can force the app to do a new sync by pulling down most of the screens that are tables (current inventory, managed database, the first order screen, etc)
- Photos are synced last because they take more processing.
How the Sync Works:
1 - When you first login then everything will by synced with the server - you should stay logged in unless you specifically log out
2 - When you move between the screens and have a wifi (not a cellular connection), the data needed for that screen will be updated - syncing is not done based upon time
3 - When you enter the app, the first sync will sync everything
4 - When you enter a sale or an order, edit a product or customer, then the data will be pushed to the server as long as there is an internet connection
5 - Sometimes it takes a couple of syncs for all the data to be exchanged, depending upon timing
6 - You can force a sync by pulling down to refresh a table. For example, if you go to Current Inventory and pull down it should start syncing
7 - Deleted items will remain on the server for one month - if you do not sync an device within that time then it is possilbe that an item deleted on another device will not be deleted from the dormant device.
Sync Troubleshooting:
1- You have been logged off. Try going to Settings/Sync and logging in.
2- If the sync seems to be hung up after the first sync has been completed, then please try logging off and logging back into your sync account.
3- The sync is hung up and no new data is being sent to the server. You can tell if that is what’s wrong if the little spinning wheel next to the wifi symbol never stops spinning. If that’s what happened, then you can usually correct the issue by hitting your device’s home button twice. Then force On Shelf to close by swiping up on the On Shelf screen shot. It should disappear.
Problems Syncing Photos:
Apple now requires that all files need to be transferred securely. This has caused issues for some users because the server calls time out. You can override this option by:
1- Opening your device's Settings App
2- In the right column, scroll down until you find On Shelf in the list of apps
3- In the Sync section, turn the toggle to "Off" next to "Use secure server for photos"
Unlocking the iPhone App on Additional iPhones
 If you have already purchased the iPhone version of On Shelf, then you can unlock it on any other iPhone that uses the same app store account. If On Shelf is not unlocked, then you cannot add more than 15 items not can you access the sync function.
To restore your On Shelf for iPhone purchase:
1- Go to Settings and select the Admin tab
2- Select "Purchase On Shelf"
3- On the next screen, use the restore button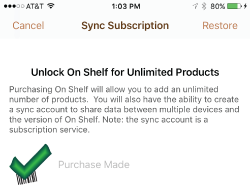
4- When On Shelf has been successfully purchased, the option to purchase will be grayed out.
Barcoding Tips
A few tips to improve the barcode readers performance:
1- Ensure you have sufficient lighting etc.
2- Try shaking iPad to cause it to refocus.
3- Once barcode scanned, do not be tempted to tidy up! Do not delete any additional spaces (leading or trailing) as this will make it impossible to retrieve the item during subsequent barcode scans.
Expanding/Contracting the Sidebar
The sidebar can be expanded or contracted on all screens, except the revenue report screen.
 1- To expand the sidebar, simply place your finger on the bar and drag toward the center of the screen. The sidebar will expand once you have dragged your finger sufficiently far. The sidebar will also automatically expand if you press some buttons, such as the sort and filter buttons. The search button does not expand the sidebar.
2- To contract the sidebar, place your finger on the bar and drag toward the left end of the screen. The sidebar will contract once you have dragged your finger sufficiently far.
Common Button Icons
Many new button icons were introduced in version 3.0. The most commonly used are:
![]() Search - displays the search bar on the screen
Search - displays the search bar on the screen ![]()
Cancel Search - remove the search bar from the screen
![]() Sort - displays or toggle the available sort options
Sort - displays or toggle the available sort options
 Ascending Sort
 Descending Sort - displays or toggle the available sort options
![]() Show - shows the available list of which reports, brands, etc. to display
Show - shows the available list of which reports, brands, etc. to display
![]() Action - email or print a report
Action - email or print a report
![]() Un-check all - uncheck all items on the screen
Un-check all - uncheck all items on the screen
![]() Select all - check all items in the order
Select all - check all items in the order
![]() Send an email
Send an email
![]() Generate a report or go to a new screen
Generate a report or go to a new screen
![]() Import
Import
Importing Product Descriptions
To enter your product description using a tab-delimited file:
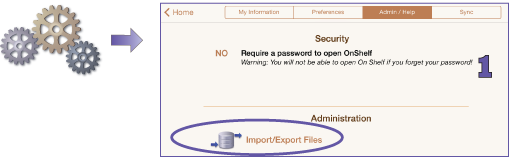
1. Go to the settings screen, then select the Admin/ Help tab. In the Administration section, select "Import/Export Files".
2. At the top of the Import/Export File screen, select the option to email the spreadsheet template file. The template is a tab-delimited file that specifies the correct column order. Email the file to yourself (or the person who will be entering your product information.
Note: You must use the template for your current version of On Shelf!
Open the file in your favorite spreadsheet program. Add your products, but do not delete the first row. When entering your information:
- Omit the currency symbol for retail and purchase price
- For the tax-exempt status, enter "Y" for yes or "N" for no.
 3. When you are finished, save the file as a tab-delimited file and make sure that it still has a .txt extension. On Shelf will only import files with a .txt extension.
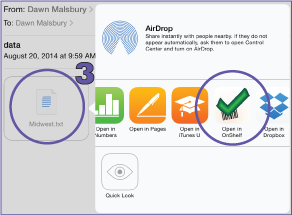
When you receive the email, go to the mail app on your iPad. Open the file in On Shelf by pressing the file icon until the selection menu appears. Select the "Open in On Shelf" option.
 4. On Shelf will open the file import screen. Select a file to import. If the import screen does not open, then you can navigate to it by going to the home screen, and selecting "Settings" then "Import/Export Files".
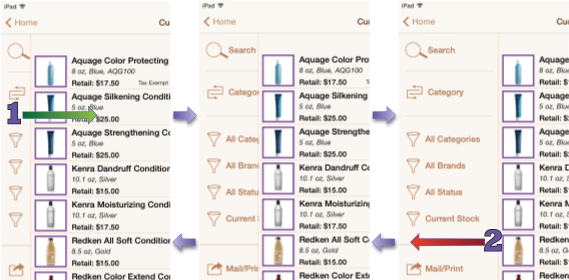
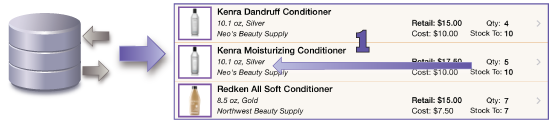
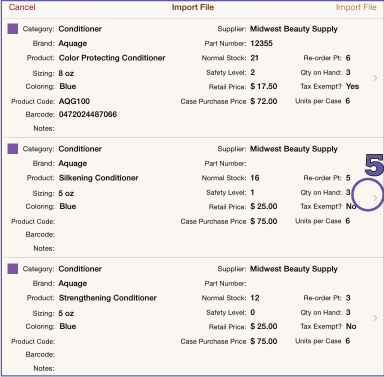 5. On Shelf will read the file and display the contents of the file. Now is the time to verify that all the information is correct. Want to change a few things before importing the new products into On Shelf? Simply select the product you want to edit.
If the product category has already been defined in On Shelf, then it will display the category color in the file description. If the categories are new, then On Shelf will add it but will not assign it a category color. You can assign a color for the category by going to the settings screen.
Similarly, if the supplier has already been defined in On Shelf, then On Shelf will associate the product with the supplier. If the supplier is new,
then On Shelf will add the supplier. You will need to add the rest of the
supplier's information on the settings screen.
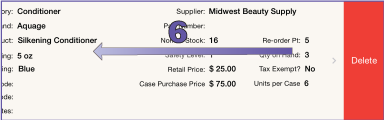 6. If you would like to delete one of the products before importing it, then simply swipe it with your finger. Confirm your selection, by hitting the delete button when it appears.
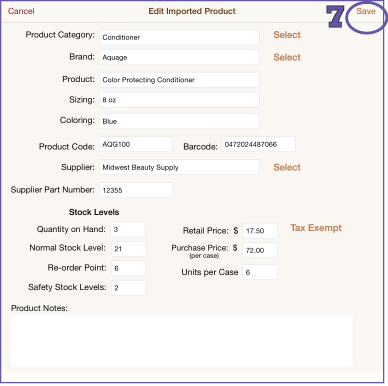 7. You can change any of the information about the imported product on the Edit Imported Product Screen. The buttons for the product category, brand, and supplier will allow you to change the entry to any category, brand or supplier that has already been saved to On Shelf. Note: you will not see any new categories, brands or suppliers from the file you are importing, because the product information has not yet been saved to On Shelf.
When you're happy with your changes, then hit "Save" to keep them. Hitting "Cancel" will remove all of the changes you have made to the product. If you change the Product Notes, any carriage returns you enter will be removed when you save your changes.
 8. If you are happy with the imported product information, then hit the "Import File" button. If you hit "Cancel" on the Import File screen, then the products will not be saved to On Shelf. Warning: if you have a lot of data, then it may take awhile to import. Please be patient.
 9. When you are happy that the file has been successfully imported, please remember to delete the file! Just swipe the file name to delete it.
Sales Reporting Options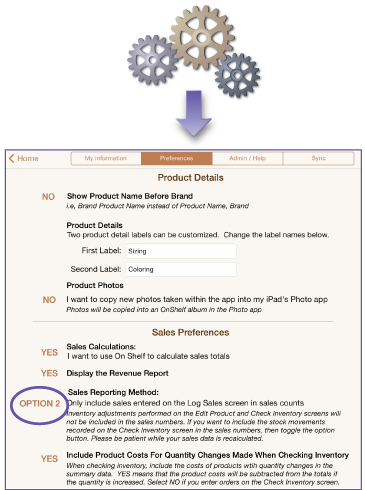
On Shelf lets you decide how to report your sales numbers. Go to the settings screen and hit the preferences tab to select the option you want to use. There are two options:
Option 1 - Count any inventory adjustments made on the Check Inventory screen and any sales entered on the Log Sales screen in the reported sales numbers. This option is best for those users who do not plan to enter every sales transaction .
Option 2 - Only include sales entered on the Log Sales screen in reported sales numbers. This option is best for those users who will enter every sales transaction on the log sales screen and who would like to use the check inventory screen to account for any missing or damaged items.
With Option 2, you may also decide whether or not you would like the costs of missing or damaged items to be included in the cost column in the revenue report.
Note: A change in quantity on hand made in the Manage Product Database area is no longer counted in the reported sales numbers. This allows you to account for missing or damaged items if you elect to use Option 1 for the sales reporting method. Note: the cost of these items will not be included in your revenue reports. If you would like change the reporting method for data that has already been entered, then toggle the options button to select the option that you want to use. This will trigger On Shelf to recalculate all of your sales numbers.
Sales Transaction Types
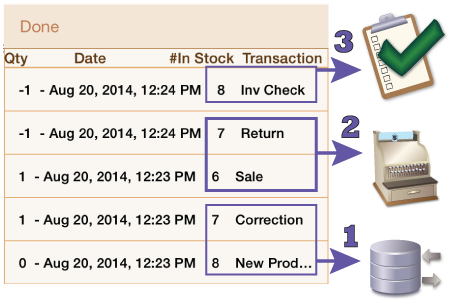
On Shelf categorizes sales transactions differently depending upon where the transaction was entered. The sales classifications used in On Shelf for the different screens are:
 1. Manage Product Database:
a. New Product - When a new product is added, On Shelf saves the quantity on hand that is entered into a sales transaction with the designator New Product. This is the only time that the new product designator is used. This transaction is special in that it can never be moved later in time, just earlier. Also, no transaction can be moved to a time before the date of this transaction
b. Correction - When you change the quantity on hand from the Edit Product screen, the transaction is classified as a correction. The treatment of this transaction type has changed with version 1.04. Prior to 1.04, these transactions were counted as either a sale or an order for reporting purposes. Now, corrections are always listed with the sales transactions, but they are not included in the reported sales numbers. This change allows you to account for missing or damaged items.
2. Log a Sale
a. Sale - Any confirmed transaction processed on the sales screen with a positive quantity. The product(s) will be subtracted from your inventory and added to your reported sales. Please note, sales transactions are only added if you press the "Confirm Sales" button.
b. Return - A" sale" with a negative quantity. The product(s) will be added back into your inventory and subtracted from your reported sales.
3. Check Inventory - any change in quantity is designated as a "Inv Check". These transactions will be included in your reported sales numbers only if you elect to use Option 1 to report your sales.
Entering a New Sale
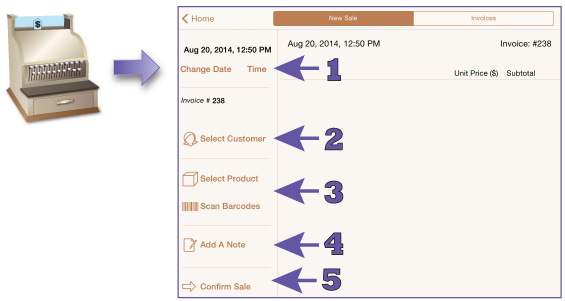
1. Go to the Sales screen. The screen should open with the New Sale tab active. Change the date and time of the transaction if you like. A new invoice number will be assigned to the sale, if you have turned on this feature in Settings.
Note: If you are using the sync feature, then sales entered offline on different iPads may have duplicate invoice numbers.
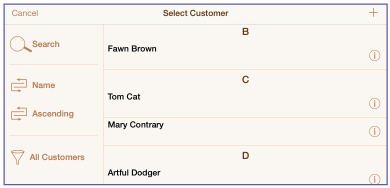
2. If you would like to enter a customer name for the sale, then hit the select customer button. A list of the customers that you have entered will appear. You can use the + button to add a new customer. Or select an existing customer from the list. The window will close and the selected customer's name will appear above the select customer button.
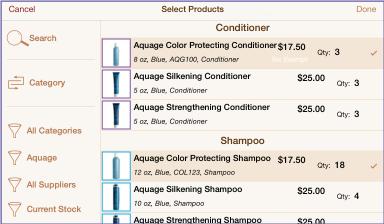
3. Products can be added to the sale using either the select products or the scan barcode button. To use the select products feature, hit the select products button to open a screen of all the products that are currently in your inventory. You can use the search feature to find a particular product. You can also sort the products by either category, brand, size or color. You can choose to show only the products in a particular category and/or brand. The selected products will be highlighted. Hit the done button when you are finished.

To use the barcode function, hit the barcode button and scan the barcode. When the barcode has been read, a new screen will appear that allow you to enter the quantity, adjust the price or add a discount. Use the next barcode button to enter a new product or the done button when you are finished.
Forget a product? Just open the select products or barcode screen again. More products can be selected. You can also deselect products on this screen.
4. You may also add a note to the sale.
If you have elected to have On Shelf calculate sales totals
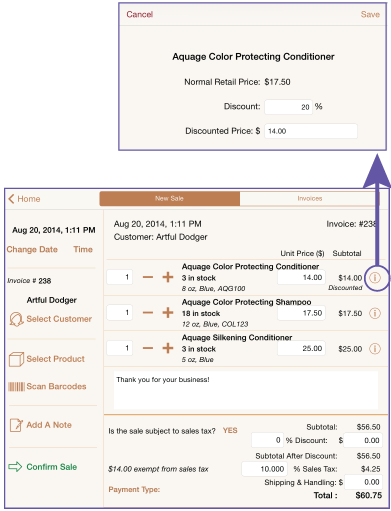
- After selecting the products in the sale, adjust the quantity sold for each product. You can also apply a discount to an individual item by hitting the blue circle at the right side of the cell.
- Discounts that apply to the entire sale and/or shipping charges can be entered in the sales summary cell.
- Toggle the sales tax button if the sale is exempt from sales tax.
5. Hit the confirm sale button to process the return. The item(s) will be removed from your inventory and added to your reported sales numbers. If you have elected to have On Shelf total your sales, then you will see a pop-up menu appear to give you the choice of printing or emailing an invoice. If you do not want to do either, then just select "Confirm Sale".
Once the sale has been processed, the products will disappear. On Shelf is now ready to process another sale. The invoice can be viewed by selecting the Invoices tab. And if necessary, you can send another copy to your customer.
Modify An Invoice
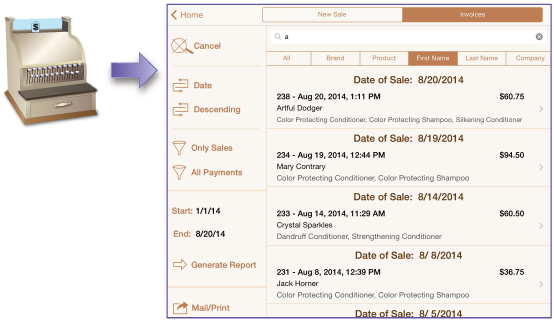
1. Go to the Sales screen and select the invoice tab. Use the Start and End buttons to select the dates for the report and then hit the Generate Report button. You can then use the search, sort and show buttons to find the invoice that you want to modify.
When you find the invoice you are looking for, then select it to view it. Or you can delete an invoice by swiping it from left to right and then selecting delete when the option appears.
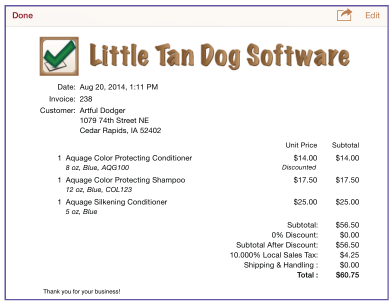
2. The invoice will be displayed, select the enter button in the upper right of the screen to edit the invoice.
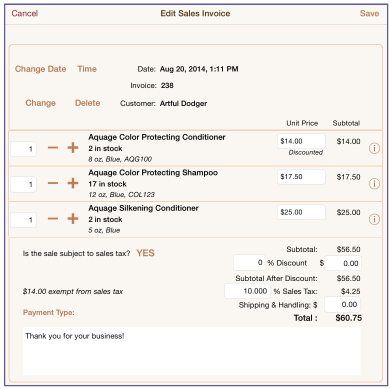
3. The date of the invoice or the customer can be changed. You can also adjust the quantities, the discounts, or the shipping charge. Sales tax can be toggled off or on.
![]()
4. You can delete a product by swiping it from left to right. Select delete when the delete button appears.
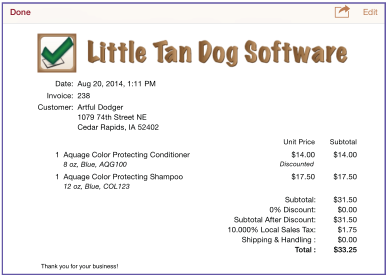
5. When you are finished modifying the invoice, then hit the Save button. The updated invoice will be displayed. You can use the action button (next to the Edit button at the top of the screen) to send or print the invoice.
Processing a Return
This option can be used if you do not have an invoice associated with the return. If you do have an invoice, then you should edit the invoice.
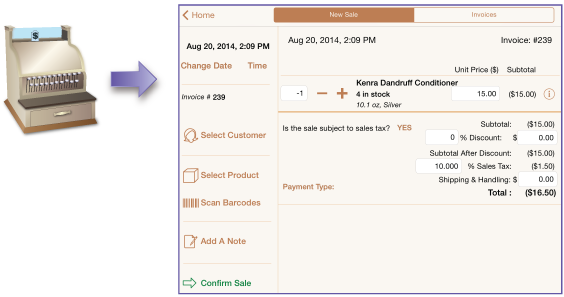
1. Go to the sales screen. If necessary, adjust the date and select a customer. Hit the Select Products@ button, choose the returned product(s) and then hit the Done button to return to the main sales screen.
2. Enter the quantity returned as a negative number. For example, if the customer returned one shampoo, then enter -1 as the quantity.
3. Toggle the sales tax button if the transaction is exempt from sales tax
4. Hit the confirm sale button to process the return. The item(s) will be added back into your inventory and subtracted from your reported sales numbers.
Creating A New Order
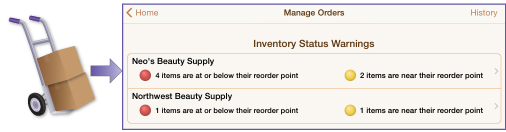
To create a new order go the the "Create and Manage Orders" screen. You will see a summary of the number of products that are in low supply from each supplier.
The red status means that the product is below its reorder point. Yellow status means that product is getting near its reorder point.
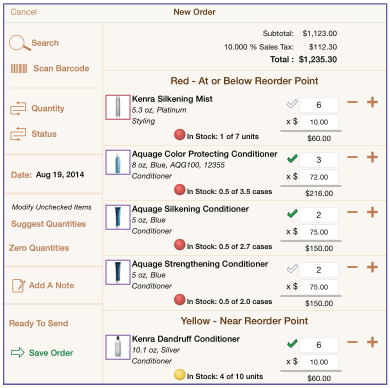
Select the supplier with whom you want to place an order. A list of the products will appear, sorted by their inventory status. You can use the search feature to display a particular product. The first sort button toggles the sort by product name or quantity needed. The second button allows you to sort products by status, category, brand, size or color.
You can also change the date, if you desire.
You can use the -/+ buttons or the text fields to adjust the number of items to order. You also have the option of changing the price of the item. If you change the price, then the product's purchase price will be permanently changed when you check in the order.
A green check mark will appear if the product has been edited or if the product was part of a pending order. Only products with a gray checkmark will be affected by the suggest quantities and zero quantities buttons. You can toggle between green/gray check marks by just touching the check mark.
The Add A Note button can be used to add a note to the order.
The ready to send button allows you to toggle between the options of ready to send and not ready to send. Orders tagged as not ready to send will be saved with a pending status.
Save the order when you are finished.
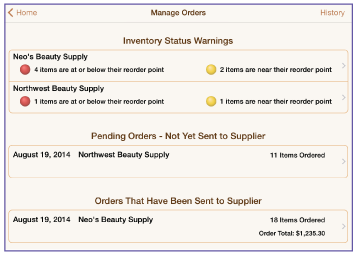
Main Order Screen - The main order screen will appear. Your order will be saved in either the Pending Orders section or the Orders That Have Been Sent To Supplier section. The pending orders can be edited by selecting them. When you are ready to send the order to your supplier, just toggle the Yes/No button () to Yes to indicate that they order is not ready to send to the supplier.
You can also delete any pending or existing order by swiping the order from left to right. Confirm that you want to delete the order by hitting the delete button when it appears.
Checking In An Order

This feature is the easiest way to increase the quantity of items in your inventory. Using this method also ensures that your product costs are accurately tracked. To check in an order go the the "Create and Manage Orders" screen.
Select the order that you have received. It will be in the last section: "Orders That Have Been Sent to Supplier". The check in screen will appear.
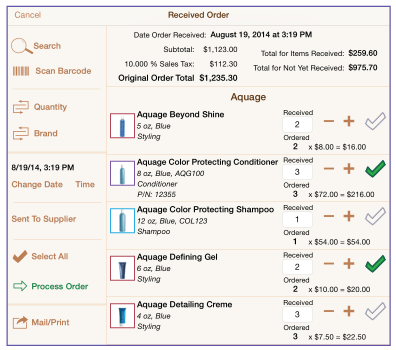
The products in the order will be listed, sorted by their brand and the quantity ordered. You can use the search feature to display a particular product. The first sort button toggles the sort by product name or quantity needed. The second button allows you to sort products by status, category, brand, size or color.
You can also change the date the order was received, if you desire.
Products that you have received should have a green checkmark. If you received all of the items in your order, then just hit the select all button and all items will be checked. You can toggle the checkmark color by pressing it. The -/+ buttons or the text fields can be used to adjust the number of items to order. A green checkmark will automatically appear if you adjust the quantities.
When you are ready, then hit the process order. The products that you received will be added to your inventory and deleted from the order. Any items that were not received will be saved in the order. If no items are missing from the order, then it will be automatically deleted for you.
Changing the Inventory Start Date
You need to change the inventory start date if you would like to enter sales for dates earlier than you entered the product into On Shelf.
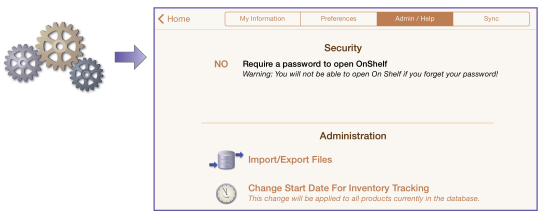
1. Go to settings and select the Admin/Help tab. Then select "Change Start Date For Inventory Tracking". It will be in the middle section on the screen.
Note: the date will only be changed for products that are currently in On Shelf, not ones that will be entered into the future. This is because the sales statistics for each product begin on the start date (or date it was entered into the app).

2. Select the date that you would like the inventory tracking to begin. The inventory start date will only be changed if the date entered is earlier than the date the product was entered into the database.
3. Once are happy with the selection hit the "Save" button in the upper right corner. Of use the "Cancel" button if you decide against making the change
Deleting a Category
Categories can only be deleted if there are no products assigned to them.
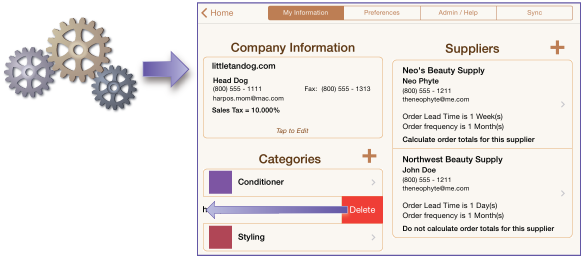
1. To delete a category, go to settings. The screen should open with the My Information tab selected.
2. Swipe the category you want to delete. (In iOS 7, the swipe must be from right to left.)
3. Confirm that you want to delete the category by pressing the delete button.
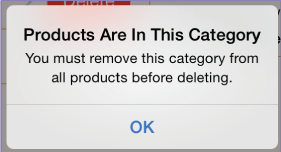
4. If there are any products associated with the category, then you will get a warning message. Go to the product database screen and assign all of the products in this category to another category. Once that has been done, you should be able to delete the category.
Deleting a Product
1. Go to the Product Database screen. Find the product you want to delete and swipe your finger to trigger the delete sequence. (Note: In iOS 7, the swipe must be from right to left.)
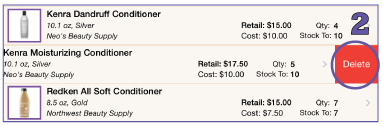
2. Confirm that you want to delete the product by pressing the delete button
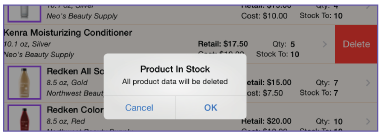
3. If the quantity on hand is greater than zero, the On Shelf will ask you to confirm that you really want to delete the product. Press OK to verify that you really want to delete the item, or press CANCEL to keep the item in your inventory.

4. The item removed from your product database.
Deleting Multiple Products
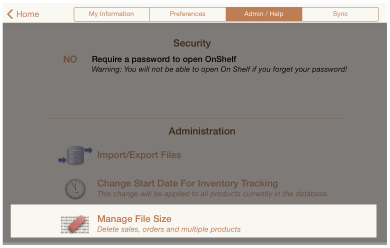
1. Go to the Settings. Select "Manage File Size". It is in the last section of the screen. You may need to scroll down to find it.
2. Press the "Go To Product Deletion Screen" button at the bottom of the screen.
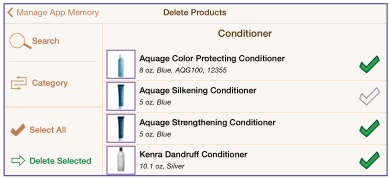
3. If you would like to delete all products, then use the "Select All" button. Otherwise, toggle the check mark next to each product that you want to delete until it is green. All products marked with a check mark will be permanently deleted from the database.
4. Hit the "Delete Selected" button when all products that you want to remove have been checked.

5. An alert will pop-up. Press "Delete" to remove the selected products from the app. Or press "Cancel" if you do not wish to remove the selected products.
Remove Sales/Order History
This feature removes the entire sales/order history from the app. Only use this if you would like to start over from scratch. All sales and order data will be removed for all products.
Go to the Settings and hit the Admin/Help tab. Select "Manage File Size". It is in the middle section of the screen.
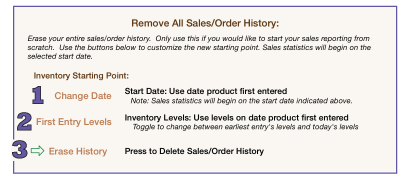
1. Use the change date button to select the date that you would like the inventory tracking to begin. The default date is today's date.
2. Select whether you would like the inventory levels to be set to their current values, or if you would like them to be re-set to the value you entered when you input each product into On Shelf.
3. Now press the erase history button to begin the removal process.
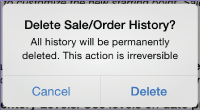
Confirm that you really want to delete all sales/order history . If you select "Delete", then On Shelf will completely remove the history. This process is irreversible.
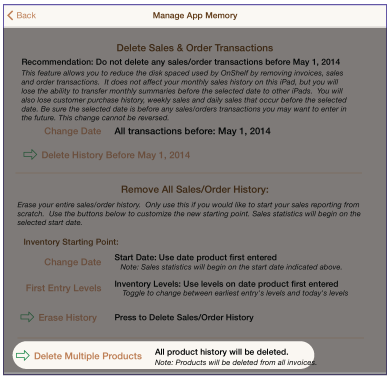
Delete Sales/Order Transactions
On Shelf currently needs 12 weeks of sales and order transactions to:
a. Create the weekly sales plots
b. Generate the current sales trend report
The order transactions are also used to generate the date received order history. If you need this feature, then do not remove order transactions within the time frame that you need this history!
You can use this feature to remove sales and order transactions. This will not affect your reported sales history as long as you do not select a date that is later than the recommended date. However, if you use this feature then you will not be able to enter sales and orders before the selected date because your sales history will be incorrect.
Use this feature with extreme caution!
To delete earlier sales and orders, go to settings and select the Admin/Help tab. The Manage File Size in the middle of the screen.

1. If you would like to select a date that is different than the recommended date, the use the change date button.
It is strongly recommended that you only select dates earlier than the recommended date.
2. Use the delete history button to initiate the removal process.
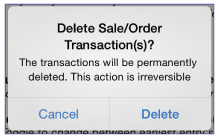
An alert will pop up. Hit the delete button to confirm that you would like to remove all sales and order transactions that occur earlier than the selected date.
Don't see a tutorial you need?
Contact us at support@littletandog.com with your tutorial suggestions!